
Free preview · full pattern in the Vintage Afghans & Bedspreads
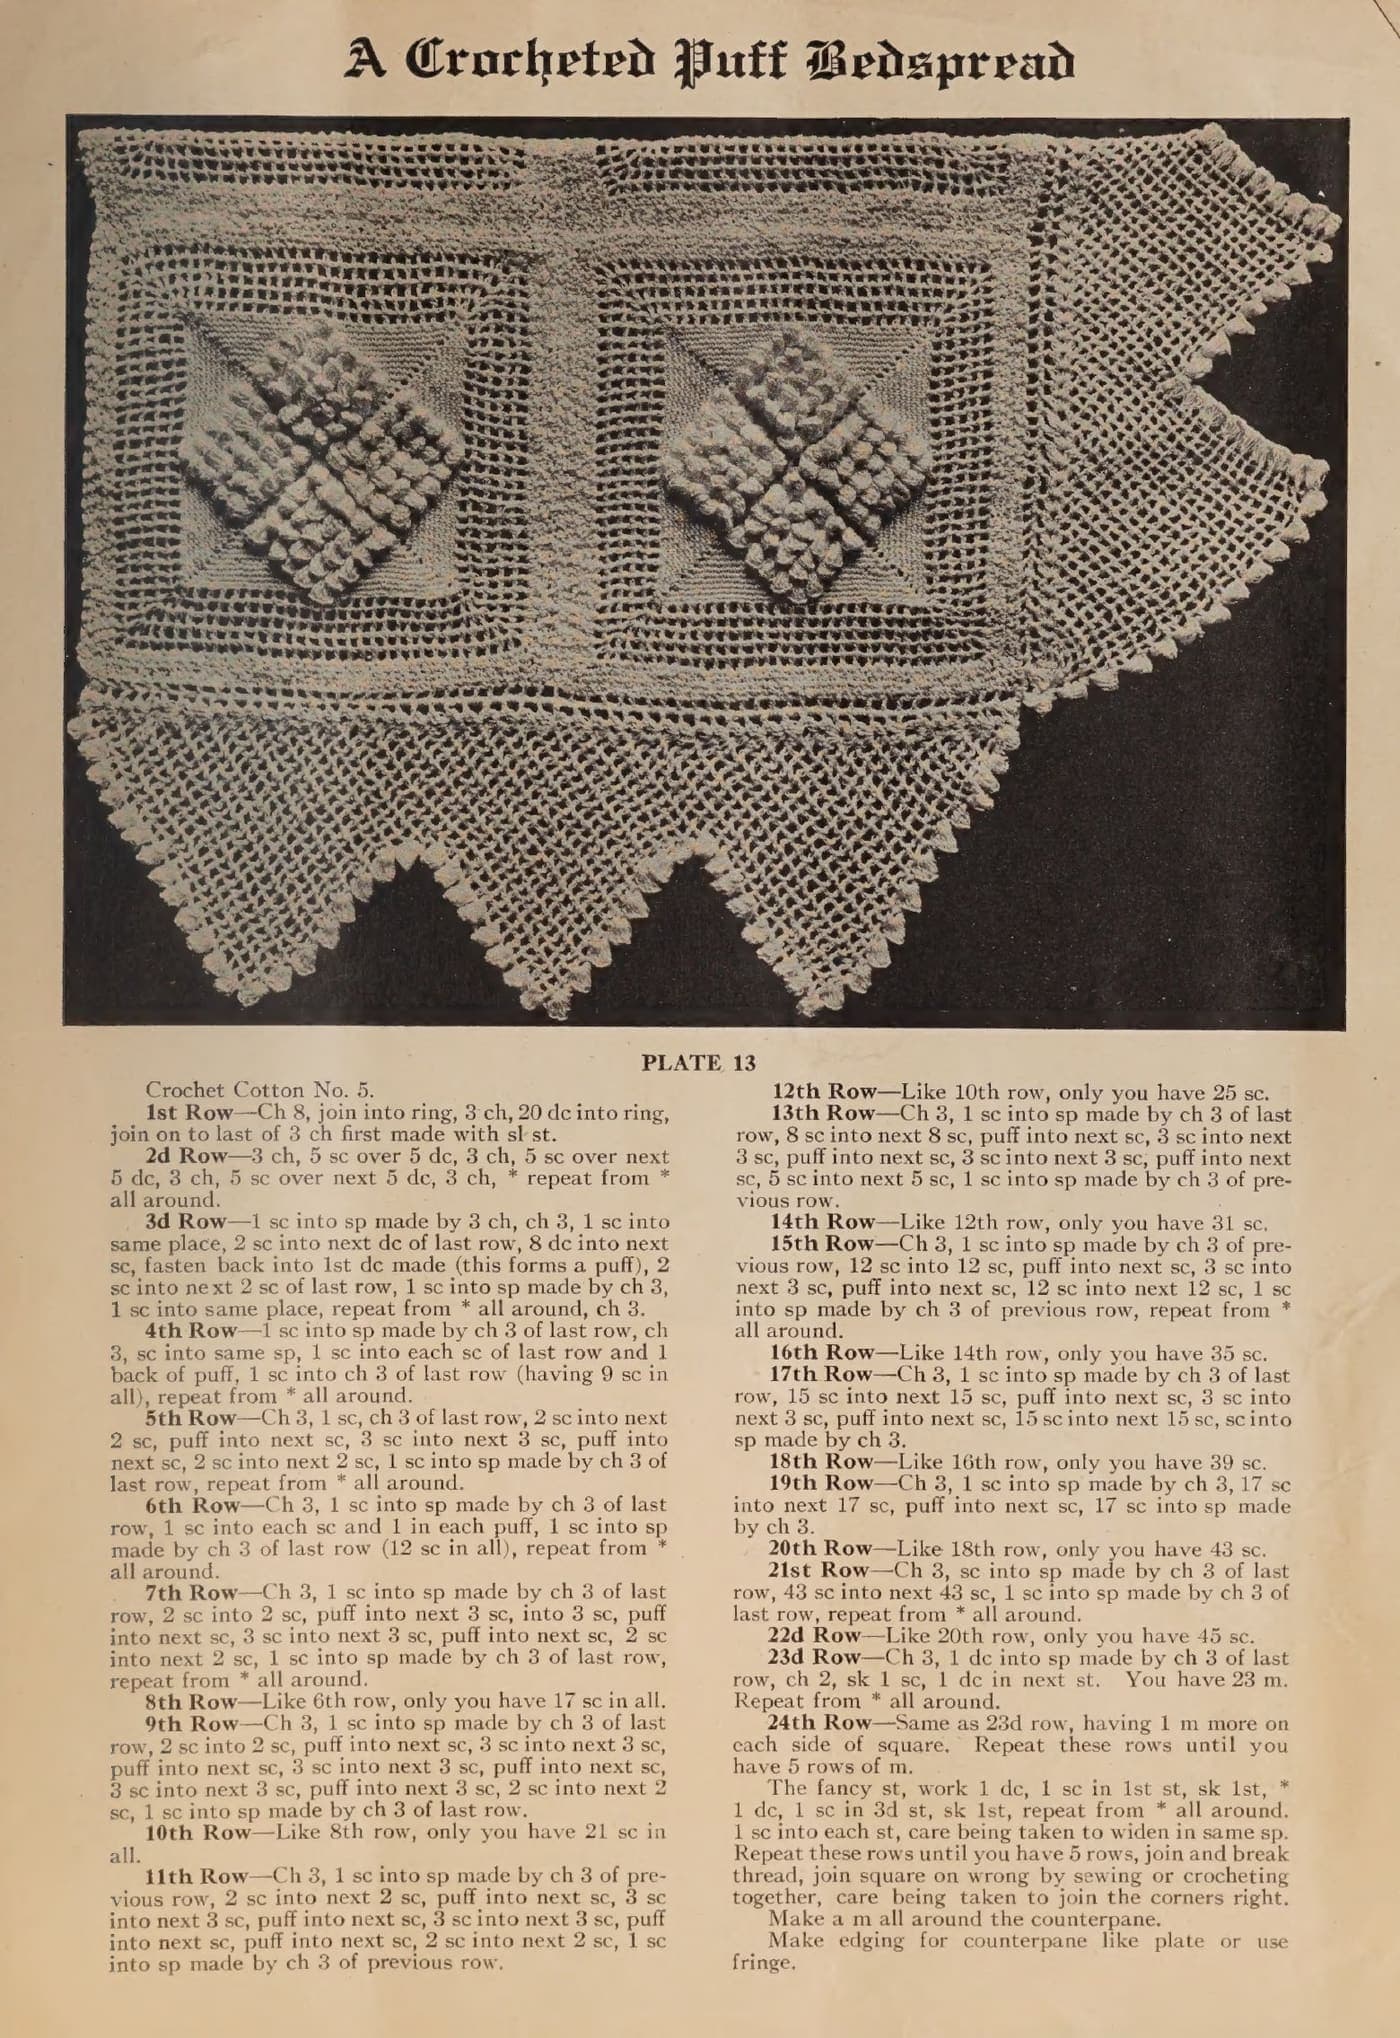
Crocheted Puff Bedspread, Plate 13 (1918): vintage crochet pattern
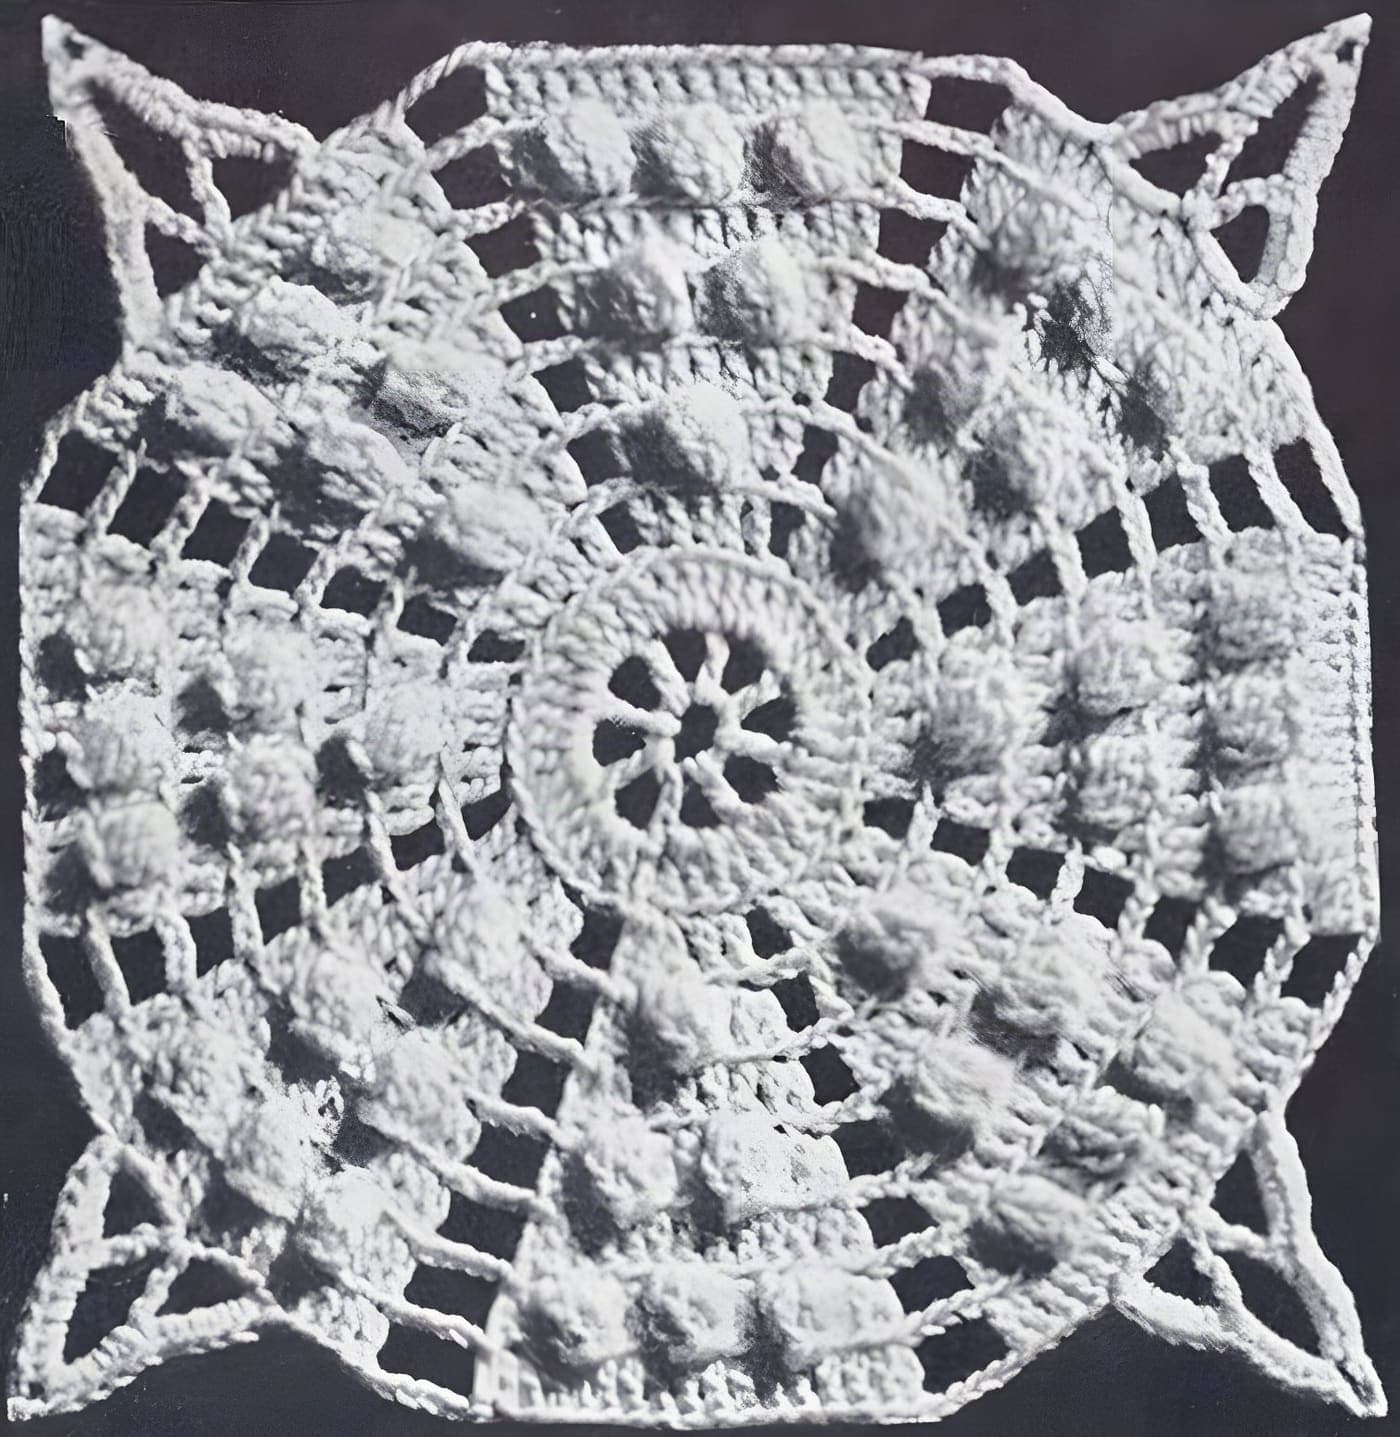
A square worked outward in rounds from a chain-8 ring. Puffs of eight double crochet fastened back into the first form a diamond in the centre of each square, every alternate round being plain single crochet with the count printed for checking. Five rounds of filet mesh and five rounds of a double-crochet-and-single-crochet fancy stitch frame it; the.
By the crochetpatterns.io editorial team · Updated · Editorial policy · pattern testing in progress
| Detail | Value |
|---|---|
| Skill level | Advanced |
| Yarn weight | Lace (#0) |
| Yardage | Not printed. (as printed; yardage not given) |
| Hook | 1.5 mm |
| Gauge | No gauge printed. |
| Finished size | Not printed. |
| Time | about 9 hours |
Materials
- Size 5 cotton crochet thread — the modern thread of the printed number ("Crochet Cotton No. 5")
- Steel crochet hook to suit the thread (no hook number is printed in the original)
- Tapestry needle for joining and for the ends
- Sewing thread if the squares are to be sewn together rather than crocheted
- Hook: Check: this book prints no hook number and no needle number for any design — not on the cover, not on the abbreviations page and not beside any plate. No modern hook can therefore be read across from a printed size. Match the hook to the thread the design names and change size until the fabric matches the photograph.
Yarn Kit & Substitution Options
This pattern calls for 350 yards of weight #0 yarn. Select a suggested yarn to see required skeins and estimated cost:
Caron Simply Soft · 100% Acrylic
315 yds per skein · High-yield yardage, silky no-scratch texture
2 skeins required
approx. $$10.98 total
Abbreviations (US terms)
- chain
- slip stitch
- single crochet
- double crochet
- stitch
- stitches
- space
- skip
- round
- repeat
Notes before you start
- Source: "A Crocheted Puff Bedspread" (Plate 13), Knitted and Crocheted Bed Spreads, Book No. 11, Anne Orr, Nashville, Tennessee, 1918. Public domain in the USA.
- As printed — materials: Crochet Cotton No. 5.. Gauge: Not given.
- Modernisation note: Stitches are converted by this book's own printed definitions under “DIRECTIONS OF STITCHES”, printed page 2 (image p-02.jpg), not by the look of the abbreviation. The naming is MODERN US. Its “SINGLE CROCHET” (No. 3) is: “Make chain, insert hook through second last chain, throw thread over hook, draw through, throw thread over hook, draw through both loops at once.” That is the modern US sc. Its “DOUBLE CROCHET” (No. 4) is: “Throw thread over hook and draw a loop through foundation chain; throw thread over hook and draw through two loops, thread over hook and draw through last two loops.” That is the modern US dc, not a single. Its “TREBLE CROCHET” (No. 5) is: “Throw thread over hook twice, draw a loop through foundation chain, throw thread over again, draw through the two loops, throw thread over and draw through two, thread over and draw through last two.” That is the modern US tr. Its “SLIP STITCH” (No. 2) is: “Insert hook in foundation chain, draw a loop through it and the loop on hook.” Its “PICOT” (No. 6) is: “Chain 4 and make single crochet in fourth chain from hook.” So this book's sc, dc and tc/tr are written sc, dc and tr here with no shift of height.
- Modernisation note: The book's “CROCHET ABBREVIATIONS” list, printed page 2 (image p-02.jpg), reads: “ch—stands for chain. sc—stands for single crochet. dc—stands for double crochet. tc—stands for treble crochet. sl st—stands for slip stitch. st—stands for stitch. blk—stands for block. hdc—stands for half double crochet. lat—stands for lattice. sp—stands for space. h tr—stands for half treble. tr—stands for treble. p—stands for picot. m—stands for mesh. f m—stands for fancy mesh. l m—stands for long mesh. sk—stands for skip. sh—stands for shell. r st—stands for roll stitch. tr tr—stands for triple treble. ks—stands for knot stitch. d tr—stands for double treble.” The book lists both “tc” and “tr” for the same stitch, treble; both are written tr below and that is the only abbreviation changed.
- Modernisation note: The book's own definitions for the fancy stitches used in these designs, all printed page 2 (image p-02.jpg), quoted so nothing has to be guessed. ROLL STITCH (No. 17): “Roll thread around needle 15 times, put thread over and draw loop through the entire 15 loops, then make one chain stitch.” KNOT STITCH (No. 8): “Having a st on the needle, drawing the loop out to the length of 3 ch, draw the thread through for ch st. Take up the single thread of this loop and work one sc st on it. Repeat once. Skip 5 sts of the previous row, if not knot st, and work 1 sc. If the previous row be knot st, make 1 sc each side of the sc between the long loops of last row.” SHELL (No. 14): “Make chain required length. Ch 3 for 1st tr, 3 tr in 4th st of ch, ch 2, 3 tr in same st *, sk 5, 3 tr in next st, ch 2, 3 tr in same st. Repeat from *. 2d Row of Shells—Make sh in each ch 2.” FANCY MESH (No. 13): “Also called Lacet. This consists of two rows. The first a row of long meshes, 1 dc, 5 ch, skip 5 st, 1 dc, repeat. For the second row, 1 dc in dc of long mesh, ch 3, catch in center of 5 ch of 1 m, ch 3, dc over dc.” SPACE (No. 7): “This is for Filet Crochet Work. Chain two stitches, skip two stitches, one double crochet into next stitch.” BLOCK (No. 9): “Also for Filet Crochet. Four dc in adjoining sts. The number of dc in adjoining blocks is found by multiplying the number of blocks by 3 and adding one.”
- Modernisation note: The book calls every round and every row a “Row” (“1st Row—”, “2d Row—”). Pieces worked outward in joined rounds from a centre ring are labelled “Rnd” below and pieces worked back and forth keep “Row”; the numbering is the book's own and nothing has been renumbered. Run-on paragraphs are split at the book's own row marks, one row or step per line. No stitch has been added, removed or reordered.
- Modernisation note: Every figure below was read back against the page image, because the scanned text of this book carries the usual optical slips: its “8” and “38” very often stand for the printed 3 (the scan's “ch 8” is “ch 3” on the page in most places), its “Ist” and “ist” are 1st, its “de” is dc, its “bik” is blk, its “si st” is sl st, its “\4”, “}%”, “14” and “1%” all stand for the printed ½, its “trin” and “scinto” are “tr in” and “sc into”, and its “WMake” is Make. The rows below follow what the printed page actually shows; the quoted extract for each design is left exactly as the scan reads, untidied.
- Modernisation note: No gauge is printed anywhere in this book.
- Modernisation note: No finished size is printed for this design — the book gives no bed size, no motif measurement and no stitch-to-inch figure — so none is stated here.
- Modernisation note: Check: no quantity of thread is printed. The book names a cotton number for some designs and nothing at all for others; it never says how many balls a bedspread takes, and no yardage has been invented.
- Modernisation note: Check: no colour is printed for any design in this book. The photographs show a plain light thread. White and écru are recorded below as the usual period choices for a cotton bedspread, not as this design's printed colour.
- Modernisation note: Modern thread suggestions below are added by this transcription and are not in the original; the original's own cotton number is kept in the materials exactly as printed.
- Modernisation note: The book defines its own puff inside rnd 3: “8 dc into next sc, fasten back into 1st dc made (this forms a puff)”. It is not the modern puff and is left as the book works it.
- Modernisation note: Check: the scan reads “ch 8” at the head of rnds 5, 9, 15, 17, 19 and 21 and inside several others; the page image reads ch 3 throughout, and ch 3 is what is written above. The one place the page really does print 8 is rnd 13's “8 sc into next 8 sc”.
- Modernisation note: Check: rnd 5 is printed “Ch 3, 1 sc, ch 3 of last row, …” with no “into sp made by” before “ch 3 of last row”, where every neighbouring round has it. The page image shows the same omission. Read it as the other rounds read; the line is left as printed.
- Modernisation note: Check: rnd 7 prints “puff into next 3 sc, into 3 sc” and rnd 9 prints “puff into next 3 sc” once among otherwise single-stitch puffs; both are on the page as well as in the scan. They do not square with the “only you have N sc” counts of the plain rounds either side, so work a square against the photograph before starting a spread.
- Modernisation note: Check: rnd 11 prints two puffs in succession (“puff into next sc, puff into next sc”) where the pattern of the surrounding rounds would put 3 sc between them. Printed as shown.
- Modernisation note: Check: the fancy stitch border says “repeat these rows until you have 5 rows”, and the mesh section likewise “until you have 5 rows of m”; the book does not number them further.
- Modernisation note: Check: the edging is not described. The book says only to make an edging “like plate or use fringe”, so the edging shown in the photograph of Plate 13 is not written anywhere in words and nothing has been invented for it.
- Modernisation note: The book's “counterpane” is kept as printed.
Row progress: 0 of 24 done (0%)
Square
0 of 24 done- Rnd 1: Ch 8, join into ring, ch 3, 20 dc into ring, join on to last of 3 ch first made with sl st.Mark row complete
- Rnd 2: Ch 3, 5 sc over 5 dc, ch 3, 5 sc over next 5 dc, ch 3, 5 sc over next 5 dc, ch 3, * repeat from * all around.Mark row complete
- Rnd 3: 1 sc into sp made by 3 ch, ch 3, 1 sc into same place, 2 sc into next dc of last row, 8 dc into next sc, fasten back into 1st dc made (this forms a puff), 2 sc into next 2 sc of last row, 1 sc into sp made by ch 3, 1 sc into same place, repeat from * all around, ch 3.Mark row complete
- Rnd 4: 1 sc into sp made by ch 3 of last row, ch 3, sc into same sp, 1 sc into each sc of last row and 1 back of puff, 1 sc into ch 3 of last row (having 9 sc in all), repeat from * all around.Mark row complete
- Rnd 5: Ch 3, 1 sc, ch 3 of last row, 2 sc into next 2 sc, puff into next sc, 3 sc into next 3 sc, puff into next sc, 2 sc into next 2 sc, 1 sc into sp made by ch 3 of last row, repeat from * all around.Mark row complete
- Rnd 6: Ch 3, 1 sc into sp made by ch 3 of last row, 1 sc into each sc and 1 in each puff, 1 sc into sp made by ch 3 of last row (12 sc in all), repeat from * all around.Mark row complete
- Rnd 7: Ch 3, 1 sc into sp made by ch 3 of last row, 2 sc into 2 sc, puff into next 3 sc, into 3 sc, puff into next sc, 3 sc into next 3 sc, puff into next sc, 2 sc into next 2 sc, 1 sc into sp made by ch 3 of last row, repeat from * all around.Mark row complete
- Rnd 8: Like rnd 6, only you have 17 sc in all.Mark row complete
- Rnd 9: Ch 3, 1 sc into sp made by ch 3 of last row, 2 sc into 2 sc, puff into next sc, 3 sc into next 3 sc, puff into next sc, 3 sc into next 3 sc, puff into next sc, 3 sc into next 3 sc, puff into next 3 sc, 2 sc into next 2 sc, 1 sc into sp made by ch 3 of last row.Mark row complete
- Rnd 10: Like rnd 8, only you have 21 sc in all.Mark row complete
- Rnd 11: Ch 3, 1 sc into sp made by ch 3 of previous row, 2 sc into next 2 sc, puff into next sc, 3 sc into next 3 sc, puff into next sc, 3 sc into next 3 sc, puff into next sc, puff into next sc, 2 sc into next 2 sc, 1 sc into sp made by ch 3 of previous row.Mark row complete
- Rnd 12: Like rnd 10, only you have 25 sc.Mark row complete
- Rnd 13: Ch 3, 1 sc into sp made by ch 3 of last row, 8 sc into next 8 sc, puff into next sc, 3 sc into next 3 sc, puff into next sc, 3 sc into next 3 sc, puff into next sc, 5 sc into next 5 sc, 1 sc into sp made by ch 3 of previous row.Mark row complete
- Rnd 14: Like rnd 12, only you have 31 sc.Mark row complete
- Rnd 15: Ch 3, 1 sc into sp made by ch 3 of previous row, 12 sc into 12 sc, puff into next sc, 3 sc into next 3 sc, puff into next sc, 12 sc into next 12 sc, 1 sc into sp made by ch 3 of previous row, repeat from * all around.Mark row complete
- Rnd 16: Like rnd 14, only you have 35 sc.Mark row complete
- Rnd 17: Ch 3, 1 sc into sp made by ch 3 of last row, 15 sc into next 15 sc, puff into next sc, 3 sc into next 3 sc, puff into next sc, 15 sc into next 15 sc, sc into sp made by ch 3.Mark row complete
- Rnd 18: Like rnd 16, only you have 39 sc.Mark row complete
- Rnd 19: Ch 3, 1 sc into sp made by ch 3, 17 sc into next 17 sc, puff into next sc, 17 sc into sp made by ch 3.Mark row complete
- Rnd 20: Like rnd 18, only you have 43 sc.Mark row complete
- Rnd 21: Ch 3, sc into sp made by ch 3 of last row, 43 sc into next 43 sc, 1 sc into sp made by ch 3 of last row, repeat from * all around.Mark row complete
- Rnd 22: Like rnd 20, only you have 45 sc.Mark row complete
- Rnd 23: Ch 3, 1 dc into sp made by ch 3 of last row, ch 2, sk 1 sc, 1 dc in next st. You have 23 m. Repeat from * all around.Mark row complete
- Rnd 24: Same as rnd 23, having 1 m more on each side of square. Repeat these rows until you have 5 rows of m.Mark row complete
Working on:
Rnd 1: Ch 8, join into ring, ch 3, 20 dc into ring, join on to last of 3 ch first made with sl st.
Continue this pattern
The rest of the Crocheted Puff Bedspread, Plate 13 (1918) pattern is in the Vintage Afghans & Bedspreads
Still to come in the full pattern:
- Fancy stitch border
- Finishing
Included with 73 patterns for $19 — $0.26 per pattern.
Errata
No corrections have been published for this pattern. Found a mistake? Tell us and we will log the fix here with a date.
Your notes on this pattern
Keep track of the yarn, hook and changes you used. Saved in this browser only — nobody else can see it.
Frequently asked questions
Where is the A Crocheted Puff Bedspread pattern from?
It was published as "A Crocheted Puff Bedspread" in Knitted and Crocheted Bed Spreads, Book No. 11 by Anne Orr, Nashville, Tennessee in 1918. The publication is in the public domain in the United States; this version is transcribed and modernised by crochetpatterns.io.
What yarn or thread do I need for the A Crocheted Puff Bedspread?
Size 5 cotton crochet thread. Not printed.
What hook should I use?
Check: this book prints no hook number and no needle number for any design — not on the cover, not on the abbreviations page and not beside any plate. No modern hook can therefore be read across from a printed size. Match the hook to the thread the design names and change size until the fabric matches the photograph. Gauge: No gauge printed.